Texturing - Quite simple, but
time consuming - My favorite part!
Now that your car's complete, your 3D view should show
a figure like this:

I don't think many people enjoy texturing because it is time consuming.
Since I have nothing better to do, I like texturing.. LOL... And I think
Ali709 hated texturing because he always did it one face at a time, until
Necron showed him how to do the whole body at once (which I am going to
show you)
Thanks to Cobra, who showed me how to texture =)
The first step is to press E on your keyboard, which brings up the
Material Editor:
Press the Copy button, and where in the name box, type in "side".
Then checkmark the PrimaryTexture box, and then press the Load
Map.. button. Choose your texture from the window that comes up
and press the Open button. Your window should now look like this:
 Now with
that part done, press the OK button and you're ready to start texturing
the side! Now with
that part done, press the OK button and you're ready to start texturing
the side!
The second step is to change one of your windows to the UV Mapper!
Do not forget this step!
The third step is to go to Surface>Mapping>Assign UV as shown here:
Then click on your model in the side view. ZM should change itself
to the faces level, and your car should look like this:
Your car as red dots on each face, indicating the faces level.
 Now,
use the Select>Single tool and right click on each of the faces you
want to texture (on the side!) The faces will turn red,
indicating you have selected them. Consult with your 3D view to make
sure you aren't selecting the wrong faces. Now,
use the Select>Single tool and right click on each of the faces you
want to texture (on the side!) The faces will turn red,
indicating you have selected them. Consult with your 3D view to make
sure you aren't selecting the wrong faces.
There is a quicker way to do this, but since you already made the top and
bottom, it would interfere with the front/back/top faces.
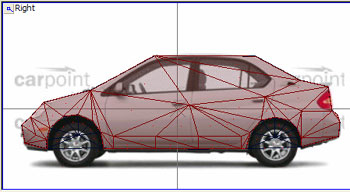
So after you have selected all the faces, the Right view should appear
like this:
Now that you have the selecting part done, you right click on Surface
in the object box, go to he Faces menu, and click on Properties,
as shown here: -------------->
You should get the Attributes window, as shown below:
 Click on
the side material as highlighted above. Click on
the side material as highlighted above.
Now that you have this done, in the SIDE VIEW,
click on one of the selected faces with the LEFT mouse button,
and press the spacebar at the same time. Do this until you
get the whole side into the UV Mapper.

Your UV Mapper should look similar to this:
You notice that the shape you made in ZM is way bigger than the texture,
correct? This is when you use the
 Modify>Scale
tool. -----> Modify>Scale
tool. ----->
Make sure you are in the Objects level and using the XY Axis when
using this tool in the UV Mapper!

Now, you scale the faces that you made to fit onto that texture in the UV
Mapper that you
 have
loaded. After it is scaled to about the right size, you must use the
Modify>Move tool to move it onto the car you have there. have
loaded. After it is scaled to about the right size, you must use the
Modify>Move tool to move it onto the car you have there.
Your car should have almost a perfect fit on the
texture. Mine looks like this:
You will also notice that it is textured in the 3D view!
Because of my one minute model, I didn't shape the roof properly, causing
the texture to be messed up on the car. Now I think after showing
you how to texture the side, you should be able to texture the rest of the
car. It is the same thing, but selecting different faces and
textures.
If you require further assistance, send me an email
at awesys@awesysnet.ca
Thanks,
-Awesys |